Template TOU
They are for Personal Use ONLY.
Do NOT share in groups/forums etc. have them come to my blog to download them for themselves.
You can use my templates for tutorials as long as you credit me and link back to my blog.
You CANNOT supply them for your tutorials either.
Friday, June 26, 2009
 Story Time
 I'm using the talented artwork of Suzanne Woolcott. You must have a license to use her work, which you can get at GorjussArt.
Supplies:
Tube of choice
Font(s) of choice - I used Hello Kitty and Andalus
Scrap kit "GoodNight My Lil Angel" by Vicki.
You can get it HERE.
Plugin:
Eye Candy - Gradient Glow
Lets go...
Open a new canvus 650x650, flood fill white.
Open up Paper4, resize by pixels to 650, paste as a new layer. Got ot Layers-Load/Save Mask-Load From Disk, find WSL Mask260 and hit ok.
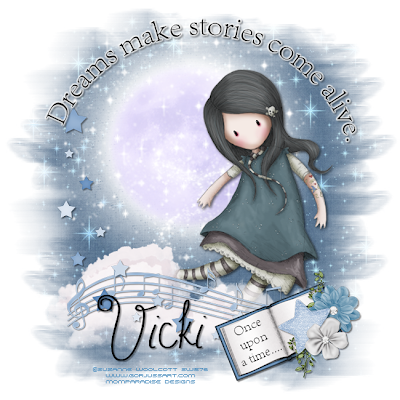
Copy and Paste the Moon, resize by 30%, place it slight to the upper left but staying within the paper mask.
Copy and Paste Cloud2, resize by 15%, place it at the bottom of the mask. see my tag for reference.
Copy and Paste Music Notes, resize by 13%, place it on top of the clouds. Add drop shadow.
Copy and Paste Storybook2, resize by 10% and free rotate it 22 left. Add drop shadow. Place it to the bottom right. Youadd text on the book but you'll need to do it when it's bigger. I typed out "Once upon a time" using Andalus. Once youhave it the way you want, then merge visible.
Copy and Paste Leaves, resize by 10% then again by 50%. Place to the right of the book. Add drop shadow.
Copy and Paste Flower3, resize by 20% then again by 40%, Place to the right of the book. Add drop shadow.
Copy and Paste Flower1, resize by 20% then again by 35%. Add drop shadow. Place to the bottom of flower 3.
Copy and Paste GlitterStar2, resize by 20% then again by 45%. Add drop shadow. Place inbetween flower 1 & 3.
(see tag for reference)
Copy and Paste Starborder, resize by 20% then again by 50%. Mirror and add drop shadow. Place to the left, abovethe music notes but below the book layers.
Copy and Paste tube. Resize if needed. Add drop shadow. Place under cloud layer and to the right.
Set your foreground to black and your background to null. Using your Ellipse tool draw out a nice size circle.Center it. DO NOT convert to raster. Open a new Vector layer. Move your text tool over the circle until you getan A with a curved line under it like this:
Now click and type out any phrase you'd like I typed "Dreams make stories come alive". Now center your text by move itlike you would a regular text. Once happy Convert to raster and delete the circle layer. Add a white gradient glow of choice and a drop shadow.
Add Name and Copyright. Delete the white background and save as png.
And that's it!
Thanks for trying my tutorial. Hope you had fun!!
Subscribe to:
Post Comments (Atom)
Followers
Labels
- Armando Heurta (1)
- award (2)
- Barbara Jensen (1)
- Camilla Drakenborg (2)
- Collab (1)
- Diana Martinez (1)
- Elias Chatzoudis (5)
- FTU (21)
- FTU Artist (2)
- Ismael Rac (21)
- Jamie Kidd (2)
- Jose Cano (1)
- Kat NKDA (1)
- Keith Garvey (5)
- Legends Art (1)
- No Kit Used (6)
- PinUpToons (1)
- PTU (45)
- Shawli (1)
- Sole Otero (1)
- Susan McKivergan (3)
- Suzanne Woolcott (7)
- Templates (20)
- Tuts (64)
- Unholy Vault Designs (1)
- Zindy S.D. Neilsen (4)


0 comments:
Post a Comment
Note: Only a member of this blog may post a comment.