
Grab My Blinkie

Places I Hang Out


Saturday, May 30, 2009
 Midnight

I'm using the stunning artwork of Debora Aguelo. You find her work HERE.
Supplies:
Scrapkit "The Saga: Add-on: Midnight" by Cora. You can purchase it HERE.
Tube(s) of Choice
Font of Choice, I used Silk Script
WSL Mask 178 HERE
Here we go...
Open a new canvus 700x700, we can resize it later. Flood fill white.
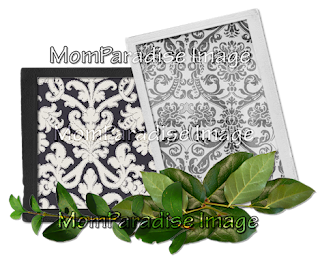
Copy and Paste Frame 01. Resize 80% and free rotate 90 left. Using your magic wand selection tool, click inside the frame. Selections-Modify-Expand by 4. Copy and Paste Paper 07. Invert selection and hit delete on your keyboard. Select none.Drop paper layer below the frame layer.
Now copy and paste Frame 02. Resize by 80% and free rotate 13 left. Using your magic wand selection tool, click inside the frame. Selections-Modify-Expand by 4. Copy and Paste Paper 06. Invert selection and hit delete on your keyboard. Select None. Drop paper layer below the frame layer.
Copy and Paste Greens 03. Resize 80%. Move the right on top of the white frame. Duplicate layer and resize again 80% and mirror.Put the duplicate close to the original. See my tag for referrance. Add a drop shadow to both layers.
Now copy and paste Greens 01. Resize by 70%. Place this along the bottom to where its covering the bottom of the black frame. You should have something like this:
Copy and Paste Flower 03. Resize 45%. Place it to the right on top the greens. Add a drop shadow.
Copy and Paste Flower 01. Resize 25%. Place it to the left on top the greens. Add a drop shadow.
Copy and Paste Pine-Cone. Resize 70%. Place it to the right on top the black flower. See my tag for referrance. Add a dropshadow.
Copy and paste Vintage-Key. Resize by 75% and free rotate 90 left then 13 left. Place it on the left edge of the white frame. Add a drop shadow.
Copy and Paste Bow 02. Resize 45%. Place it on top of the key. Make it look like the key is hanging from the bow. Add adrop shadow.
Copy and Paste Tag-Blank. Resize 80%. Place this layer below the white flower and pine cone layers. Move the tag to whereit is centered at the bottom between the white flower and cone. Add a drop shadow.
Using your magic wand selection tool. Select inside one of the frames. Selection-Modify-Expand by 4. Copy and paste your tubeResize if needed. Move your tube to where its inside the frame. Invert selection and hit delete on your keyboard. Select none.Add a drop shadow. Do the same thing for the other frame.
Highlight the background layer. copy and Paste Paper 09. Go to Layers-Load/save Mask-Load Mask fromdisk. Find WSL Mask 178 and hit ok. Merge group.
This is the time to crop your tag and resize it to your liking. Doing this now will make your name look better.
Add your name(apply a drop shawdow of 2,2,40,2 to make it stand out more) and copyright.
You're done!!
Thanks for trying my tutorial. Hope you had fun.
Supplies:
Scrapkit "The Saga: Add-on: Midnight" by Cora. You can purchase it HERE.
Tube(s) of Choice
Font of Choice, I used Silk Script
WSL Mask 178 HERE
Here we go...
Open a new canvus 700x700, we can resize it later. Flood fill white.
Copy and Paste Frame 01. Resize 80% and free rotate 90 left. Using your magic wand selection tool, click inside the frame. Selections-Modify-Expand by 4. Copy and Paste Paper 07. Invert selection and hit delete on your keyboard. Select none.Drop paper layer below the frame layer.
Now copy and paste Frame 02. Resize by 80% and free rotate 13 left. Using your magic wand selection tool, click inside the frame. Selections-Modify-Expand by 4. Copy and Paste Paper 06. Invert selection and hit delete on your keyboard. Select None. Drop paper layer below the frame layer.
Copy and Paste Greens 03. Resize 80%. Move the right on top of the white frame. Duplicate layer and resize again 80% and mirror.Put the duplicate close to the original. See my tag for referrance. Add a drop shadow to both layers.
Now copy and paste Greens 01. Resize by 70%. Place this along the bottom to where its covering the bottom of the black frame. You should have something like this:

Copy and Paste Flower 03. Resize 45%. Place it to the right on top the greens. Add a drop shadow.
Copy and Paste Flower 01. Resize 25%. Place it to the left on top the greens. Add a drop shadow.
Copy and Paste Pine-Cone. Resize 70%. Place it to the right on top the black flower. See my tag for referrance. Add a dropshadow.
Copy and paste Vintage-Key. Resize by 75% and free rotate 90 left then 13 left. Place it on the left edge of the white frame. Add a drop shadow.
Copy and Paste Bow 02. Resize 45%. Place it on top of the key. Make it look like the key is hanging from the bow. Add adrop shadow.
Copy and Paste Tag-Blank. Resize 80%. Place this layer below the white flower and pine cone layers. Move the tag to whereit is centered at the bottom between the white flower and cone. Add a drop shadow.
Using your magic wand selection tool. Select inside one of the frames. Selection-Modify-Expand by 4. Copy and paste your tubeResize if needed. Move your tube to where its inside the frame. Invert selection and hit delete on your keyboard. Select none.Add a drop shadow. Do the same thing for the other frame.
Highlight the background layer. copy and Paste Paper 09. Go to Layers-Load/save Mask-Load Mask fromdisk. Find WSL Mask 178 and hit ok. Merge group.
This is the time to crop your tag and resize it to your liking. Doing this now will make your name look better.
Add your name(apply a drop shawdow of 2,2,40,2 to make it stand out more) and copyright.
You're done!!
Thanks for trying my tutorial. Hope you had fun.
Unique

click to view image larger
 I'm using the very talented artwork of Zindy SD Nielsen. You need a license to use her work. She does offer some free tubes which you can obtain at her site Zindy Zone.
Supplies:
Wings and Metal Dangles by DoziBaer
Wings HERE and Dangles HERE
Tube of Choice
Font of Choice (I used Carlotta)
Mask of Choice...I can't remember which one I used Sorry =(
My Frame, Wordart, and texture(if this is yours please let me know so I can give you the proper credit) HERE
These supplies are for personal use and this tutorial only. You may not use these supplies for any other tutorials without permission. Please do not add any of these items to kits or grab bags.
Plugins:
Eye Candy Gradient Glow
I know its a lot...but here we go.
Open a new canvas 800x800, we can resize it when we are done. Flood fill white.
Copy and paste the black wings. Resize by 80%. Add a drop shadow.
Copy and paste my frame. Using the magic wand selection tool. click inside the frame. Selections-Modify-Expand by 5. New raster layer flood fill with black. Keep selected. Now copy and paste the texture. Invert selection and hit delete on your keyboard. Change the layer property to Luminance(L) and lower the Opacity to 36 or so. Select None. Move these two layers below the frame layer.
Copy and paste my wordart. Resize if needed. Place it in side the frame to the right. Add a subtle white gradient glow and a drop shadow.
Copy and paste one of the metal dangles. You can choose one that is the same letter as your name or some random letter its your tag. Add a drop shadow. Place it at the top left of the frame. Erase some of the metal loop to make it look like its hooked on the the frame.
See my tag for reference.
Take your magic wand and select inside your frame. Selection-Modify-Expand by 5. Copy and paste your tube. Place it the left of the frame. Invert selection and hit delete on your keyboard. Select none. Add a drop shadow. Move tube below frame layer.
Highlight the background layer. New raster layer flood fill with a color you like. Go to Layers-Load/save Mask-Load Mask from disk. Find your mask and hit OK. Merge group.
This is the time to crop your tag and resize it to your liking. Doing this now will make your name look better.
Add copyright and name. Add a heavy drop shadow to the name so it stands out.
And that's it.
Thanks for trying my Tut. Hope you had fun!!

Subscribe to:
Posts (Atom)
Looking 4 a Tut
