Template TOU
 Nurse Lovey

Click on image to view larger
This tutorial was written by Paradise Designs on May 23 2010 and is based on a design of my own concept and any similarities are purely coincidental
I'm using the lovely artwork of Shawli. You need a license to use her work. You can purchase one at MPT.
Supplies:
Tube of Choice
Font of Choice
Scrap Kit "Nurse Lovey" by Vicki of Pink Princess Scraps. You can purchase it HERE.
My Template 35 HERE.
Lets get going...
Open my template and press shift+D, to duplicate. Delete original template and now the copyright info on the template.
Highlight the middle oval layer. Go to selections-select all-float-defloat. Copy and paste paper 4. Invert selection and hit delete on your keyboard. Select None. Delete the original oval. Add a drop shadow to the paper oval.
Highlight the Upright Oval. Go to selections-select all-float-defloat. Add a new raster layer and flood fill with #a5194a. Select None. Now go to Adjust-Add/Remove Noise-Add noise and use these settings:
Gaussian
Noise: 61
Monochrome is Checked
Delete the original oval and add a drop shadow.
Copy and Paste the Notebook paper (ele36). Resize by 45 and rotate 10 right. Add a drop shadow. Place this where the gray rectangle in the back. Delete the rectangle.
Highlight the circle. Go to selections-select all-float-defloat. Copy and paste paper 11. Invert selection and hit delete on your keyboard. Select None. Delete the original circle. Add a drop shadow.
Highlight the square layer. Go to selections-select all-float-defloat-modify-Select Selection Border.Use these settings:
Inside
Border width: 20
Anti-alias is Checked
Copy and Paste Paper 10. Invert Selection and hit delete on your keyboard. Select None and add a drop shadow.
Highlight the thin rectangle. Go to selections-select all-float-defloat. Add a new raster layer and flood fill with #eb5c8f. Select None. Delete the original rectangle. Add a drop shadow.
Now add a drop shadow to the dotted lines layer.
Highlight the gray Square. Now go to selections-select all-float-defloat. Copy and Paste your tube. Place the face in the selected area. Invert Selection and hit delete on your keyboard. Select None. Duplicate. On the bottom tube change the blend mode to Luminance(legacy). Change the blend mode on the top tube to Soft Light.
Copy and Paste the Lollipop (ele29). Resize by 45 and add a drop shadow. Place in the middle of the square and small circle. Move below the square layer.
Copy and Paste the dark pink Paperclip (ele40). Resize by 40 and add a drop shadow. Place to where it looks like it is "clipped" onto the square and tube. Erase all but the small loop. We want it to look like its holding the picture of the tube onto the oval.
See my tag for reference
Copy and Paste the Heartbeat Line (ele3). Resize by 45. Place to the left of the thin rectangle. Duplicate. Now place the dup next to the original. You want to match up the ends, so it looks like one continuous beat. I put the first upward line right next to the last downward line. Erase the overlaps and any line and the ends that go over the ends of the rectangle. Merge together and add a drop shadow.
Copy and Paste the Nurse's hat (ele1). Resize by 50 and rotate 7 right. Place to the right of the thin rectangle. Add a drop shadow.
Copy and Paste the Pil Bottle (ele6). Resize by 50. Place to the the left of the rectangle. Add a drop shadow.
Copy and Paste the Syringe (ele7). Resize by 45 and rotate 7 left. Place to the left of the rectangle. Add a drop shadow.
Now type out a saying you'd like it. I typed out "I'm your new drug!" Covert to raster and rotate 10 left. Add a drop shadow. Place to the top left.
Copy and Paste your Tube. Resize if needed. Place to the right. Add a drop shadow. Erase any parts that go below the thin rectangle. Move tube below the thin rectangle layer.
Now you can resize before adding your name and copyright.
Once happy with the size, add your copyright and Name. Delete the white background. Merge Visible and save to your computer.
You're done!!
Thanks for trying my tutorial! Hope you had fun.
 Lost
Lost
 Click on image to veiw larger
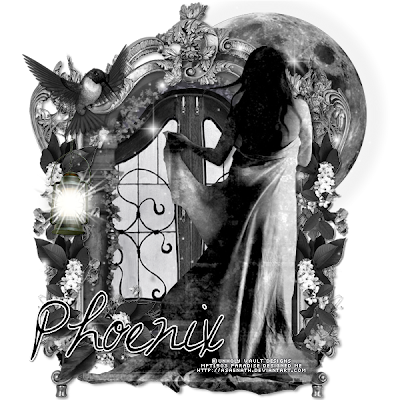
This tutorial was written by Paradise Designs on May 20 2010 and is based on a design of my own concept and any similarities are purely coincidental.
I'm using the lovely artwork of Unholy Vault Designs. You need a license to use her work. You can Purchase one at MPT.
Supplies:
Tube of Choice
Font of Choice
Scrap Kit "Lost Fairy" a collab by 3Ps Designs and Pink Princess Scraps. You can purchase it HERE.
Plug-ins:
Eye Candy - Gradient Glow
Lets get going...
Open a new canvas of 700x600, flood fill white. You can resize later.
Copy and Paste the Silver Frame (ele51). With your magic wand tool, click inside the frame. Go to Selections-Modify-Expand by 8. Add a new raster layer. Copy Paper 16. click on the new raster layer and paste into selection. Select None. Now go to Adjust-Hue/Saturation-Colorize set both to Zero(0). Move the paper layer below the frame layer. Add a drop shadow to the frame.
Copy and Paste the Window (ele83). Resize by 85 and add a drop shadow. Place in the middle of the frame. Duplicate the paper layer. Move the top paper layer above the window layer. With your freehand selection tool, go around the center of the paper like so:

Now hit delete on your keyboard. You should be able to see the window and have it look like it is behind the columns.If you need to zoom in and with your eraser tool erase some of the top paper to make it look better.
Copy and Paste the Flower Border (ele17). Resize by 80. Add a drop shadow and place to the bottom right of the frame. Duplicate and Mirror, place that one to the bottom left.
Copy and Paste the Sparkles (ele92). Place in the middle.
Copy and Paste the Moon (ele14). Resize by 45. Adjust-Hue/Saturation-Colorize set both to Zero(0) and place it to the top left. Now we are going to add a "glow" to it. Go to Effects-Plug ins-Eye Candy-Gradient Glow apply these settings:

Move the moon below the bottom paper layer. Add a drop shadow.
Copy and Paste the Lantern (ele58). Resize by 45. Add a drop shadow. Place to the left of the frame.
Copy and Paste the Bird (ele35). Resize by 40 and mirror. Add a drop shadow and place to the top left.
Copy and Paste your Tube. Resize if needed. Place to the right. Go to Adjust-Hue/Saturation-Colorize set both to Zero(0). Add a drop shadow.
Now you can resize before adding your name and copyright.
Once happy with the size, add your copyright and Name. Delete the white background. Merge Visible and save to your computer.
and You're done!!
Thanks for trying my tutorial! Hope you had fun.
Followers
Labels
- Armando Heurta (1)
- award (2)
- Barbara Jensen (1)
- Camilla Drakenborg (2)
- Collab (1)
- Diana Martinez (1)
- Elias Chatzoudis (5)
- FTU (21)
- FTU Artist (2)
- Ismael Rac (21)
- Jamie Kidd (2)
- Jose Cano (1)
- Kat NKDA (1)
- Keith Garvey (5)
- Legends Art (1)
- No Kit Used (6)
- PinUpToons (1)
- PTU (45)
- Shawli (1)
- Sole Otero (1)
- Susan McKivergan (3)
- Suzanne Woolcott (7)
- Templates (20)
- Tuts (64)
- Unholy Vault Designs (1)
- Zindy S.D. Neilsen (4)


