Template TOU
 Pearly Diamonds by April
 Cute but Shy by Lisa

 Computer Problems
 Punk Is Sexy
This tutorial was written by Paradise Designs on March 9 2010 and is based on a design of my own concept and any similarities are purely coincidental.
I'm using the amazing artwork of Ismael Rac. You need a license to use his work. You can Purchase one at HERE.
Supplies:
Tube(s) of Choice
Font of Choice
FTU Scrap Kit " Punnky" by Tamie. You can find it on her blog HERE
My Template 28, you can grab it HERE.
Plug Ins:
Penta - Jeans (optional)
Lets get going...
Open my template and duplicate (shift+D). Delete original temp and copyright info.
Highlight the Blue Oval layer. Selections-Select All-Float-Defloat. Copy and Paste Paper 3. Invert Selection and hit delete on your keyboard. Select none. Add a drop shadow to the paper and to the pink glittered oval.
Highlight the Black Oval layer. Selections-Select All-Float-Defloat. Copy and Paste a close up of your tube. Move it to the left a little. Invert Selection and hit delete on your keyboard. Select none. Lower the Opacity to about 55. Add a drop shadow to the tube and to the oval.
Copy and Paste the Glitter Trail. Resize by 45 and Rotate 90 left. Add a drop shadow. Move to the left behind the purple rectangle.
Highlight the Purple Rectangle. Go to Effects-PlugIns-Penta-Jeans and use these settings:
Amount: 28
Border Width: 4
Add a drop shadow to the rectangle, Dotted rectangle, and the wordart.
Highlight the Larger Square layer. Selections-Select All-Float-Defloat. Copy and Paste Paper 9. Invert Selection and hit delete on your keyboard. Keep Selected. Invert selection again. Copy and Paste your tube. Invert Selection and hit delete on your keyboard. Select None. Duplicate tube. On the bottom tube change the blend mode to Luminance (l) and on the top tube change the blend mode to Hard Light. Add a drop shadow to the square.
Highlight the Smaller Square layer. Selections-Select All-Float-Defloat. Copy and Paste Paper 8. Invert Selection and hit delete on your keyboard. Keep Selected. Invert selection again. Copy and Paste your tube. Invert Selection and hit delete on your keyboard. Select None. Duplicate tube. On the bottom tube change the blend mode to Luminance (l) and on the top tube change the blend mode to Overlay. Add a drop shadow to the square.
Copy and Paste your tube. Resize if needed. Place to the left. Add a drop shadow.
Copy and Paste Skull 3. Resize by 50 and rotate 10 left. Add a drop shadow and move to the left of the purple rectangle.
Copy and Paste the Hanger. Resize by 60. Add a drop shadow and place it to where it looks like its clipped onto the smaller square.
Copy and Paste Bow 4. Resize by 45. Add a drop shadow. Move this to the top of the hanger.
Copy and Paste the Butterfly. Resize by 45. Add a drop shadow. Move to right bottom corner of the larger square.
Add your copyright and Name. Delete your white background and Merge Visible. Save as a PNG
You're done!!
Thanks for trying my tutorial! Hope you had fun.
 Cherry

I'm using the amazing artwork of Ismael Rac. You need a license to use his work. You can Purchase one at HERE.
Supplies:
Tube(s) of Choice
Font of Choice
Cherries of Choice (the ones I used are from Rac's Red Heel Cherry Tube)
My Template 27, you can grab it HERE.
Plug Ins:
Xenofex 2 - Constellation
Xero - Fritillary
Lets get going...
Open my template and duplicate (shift+D). Delete original temp and copyright info.
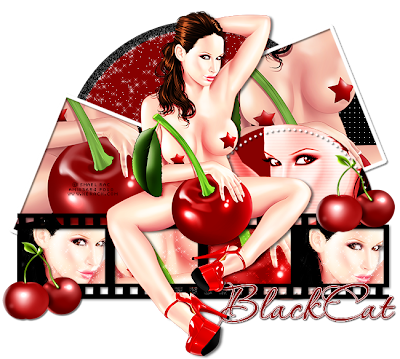
Using your magic wand tool, click inside the first frame of the filmstrip. Selection-Modify-Expand by 4. Copy and paste your tube. Move it where the part you want is in the middle. Invert selections and hit delete on your keyboard. Select None. Do the same with the next 3 film frames. Once you get all the frame filled merge the tube layers together. Move the tube layer below the filmstrip layer. Duplicate the tube layer. On the bottom tube layer go to Effects-PlugIns-Xenofex-Constellations and apply the following setting:

Change the top tube layer to Hard Light. Add a drop shadow to the bottom tube layer and the filmstrip.
Highlight the Smaller Circle layer. Go to Effects-PlugIns-Xero-Fritillary and apply the following setting:

Now Selections-Select All- Float-Defloat. Copy and Paste your tube. Invert Selection and hit delete on your keyboard. Select None. Duplicate. On the bottom tube layer go to and apply the following setting:
Width: 5
Opacity: 17
Color: Black
Horizontal and Light from left/top are Checked
Change the blend mode to Luminance (L). On the top tube layer change the blend mode to Overlay. Add drop shadows to the bottom tube layer and the circle.
Add a drop shadow to the dotted circle.
Highlight the right Black Square. Go to Effects-Texture Effects-Weave and apply the following setting:
Gap size: 1
Width: 7
Opacity: 5
Colors: White
Fill Gaps is Checked
Now Selections-Select All- Float-Defloat. Copy and Paste your tube again. Place the part you want to show. Invert selections and hit delete on your keyboard. Select None. Add a drop shadow to the white border.
Do the same to the other black square.
Using your magic wand tool, click on the red part of the bigger circle. Apply the same Constellation setting as before.
Copy and Paste your tube. Resize if needed. Place in the middle making your tube look like its sitting on the filmstrip. Duplicate. Add a drop shadow to the bottom layer and change the blend mode on the top layer to Hard Light.
Add your cherries where you like.
Add your copyright and Name. Delete your white background and Merge Visible. Save as a PNG
You're done!!
Thanks for trying my tutorial! Hope you had fun.
Followers
Labels
- Armando Heurta (1)
- award (2)
- Barbara Jensen (1)
- Camilla Drakenborg (2)
- Collab (1)
- Diana Martinez (1)
- Elias Chatzoudis (5)
- FTU (21)
- FTU Artist (2)
- Ismael Rac (21)
- Jamie Kidd (2)
- Jose Cano (1)
- Kat NKDA (1)
- Keith Garvey (5)
- Legends Art (1)
- No Kit Used (6)
- PinUpToons (1)
- PTU (45)
- Shawli (1)
- Sole Otero (1)
- Susan McKivergan (3)
- Suzanne Woolcott (7)
- Templates (20)
- Tuts (64)
- Unholy Vault Designs (1)
- Zindy S.D. Neilsen (4)


