Grab My Blinkie

Places I Hang Out


Friday, June 26, 2009
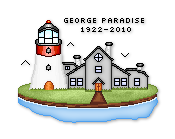
 Story Time
 I'm using the talented artwork of Suzanne Woolcott. You must have a license to use her work, which you can get at GorjussArt.
Supplies:
Tube of choice
Font(s) of choice - I used Hello Kitty and Andalus
Scrap kit "GoodNight My Lil Angel" by Vicki.
You can get it HERE.
Plugin:
Eye Candy - Gradient Glow
Lets go...
Open a new canvus 650x650, flood fill white.
Open up Paper4, resize by pixels to 650, paste as a new layer. Got ot Layers-Load/Save Mask-Load From Disk, find WSL Mask260 and hit ok.
Copy and Paste the Moon, resize by 30%, place it slight to the upper left but staying within the paper mask.
Copy and Paste Cloud2, resize by 15%, place it at the bottom of the mask. see my tag for reference.
Copy and Paste Music Notes, resize by 13%, place it on top of the clouds. Add drop shadow.
Copy and Paste Storybook2, resize by 10% and free rotate it 22 left. Add drop shadow. Place it to the bottom right. Youadd text on the book but you'll need to do it when it's bigger. I typed out "Once upon a time" using Andalus. Once youhave it the way you want, then merge visible.
Copy and Paste Leaves, resize by 10% then again by 50%. Place to the right of the book. Add drop shadow.
Copy and Paste Flower3, resize by 20% then again by 40%, Place to the right of the book. Add drop shadow.
Copy and Paste Flower1, resize by 20% then again by 35%. Add drop shadow. Place to the bottom of flower 3.
Copy and Paste GlitterStar2, resize by 20% then again by 45%. Add drop shadow. Place inbetween flower 1 & 3.
(see tag for reference)
Copy and Paste Starborder, resize by 20% then again by 50%. Mirror and add drop shadow. Place to the left, abovethe music notes but below the book layers.
Copy and Paste tube. Resize if needed. Add drop shadow. Place under cloud layer and to the right.
Set your foreground to black and your background to null. Using your Ellipse tool draw out a nice size circle.Center it. DO NOT convert to raster. Open a new Vector layer. Move your text tool over the circle until you getan A with a curved line under it like this:

Now click and type out any phrase you'd like I typed "Dreams make stories come alive". Now center your text by move itlike you would a regular text. Once happy Convert to raster and delete the circle layer. Add a white gradient glow of choice and a drop shadow.
Add Name and Copyright. Delete the white background and save as png.
And that's it!
Thanks for trying my tutorial. Hope you had fun!!

Monday, June 8, 2009
My Friend

Click on Picture to see animation.
I'm using the Gorjuss artwork of Suzanne Woolcott. You must have a license to use her artwork. You can get one from GorjussArt.
Supplies:
Tube of Choice
Font of Choice
Animation Shop (opitional)
PlugIns:
DSB Flux - Bright Noise
Here we go...
Open a new canvus 650x650, flood fill white. You can always resize later.
Copy and Paste Frame18.Using your magic wand, click inside the frame. Selections-Modify-Expand by 5.Copy and Paste Paper1. Invert selection and hit delete on your keyboard. Move this layer below the frame layer.Add a drop shadow to the frame.
Copy and Paste your tube. Resize if needed. Duplicate and move original layer below the frame. Add a drop shadow to theduplicate tube. Now erase any parts of your tube that stick outside the bottom of the frame. You might have to erase someon the original one also.
Copy and Paste Element30. Add drop shadow. Place this to the right of the frame. See my tag for reference.
Copy and Paste Element58. Resize 45%. Add drop shadow and place on top of the heart charm to where it is covering the loopat the top.
Copy and Paste Element6. Resize 45%. Add drop shadow and place in the middle of the flower.
Copy and Paste Element40. Resize 45% and Mirror. Place this to the bottom left of the frame. Add drop shadow.
Copy and Paste Element48. Resize 45%. Place on top of the leaves. Add drop shadow.
Copy and Paste Element49. Resize 30%. Place this next to the pink rose. Add drop shadow.
Copy and Paste Element53. Place this to the top left. Duplicate and Flip. Merge Down. Duplicate and Mirror. Merge Down.Move this layer to the bottom just above the white background.
Copy and Paste Element3. Resize by 60%. Place this to the left.
Add name and Copyright.
Now for the Animation Part:
Duplicate element 53 twice so you should have three layers. On the bottom layer we are going to apply the bright noise with these settings:
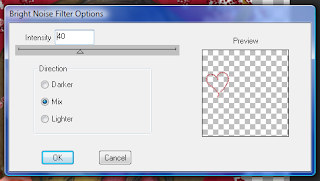

Hit ok. Now on the middle layer apply the same settings but hit the mix twice. On the top layer apply the same settingsand hit the mix three times. Hide the the top and middle layer.
Go to Edit and Copy Special-Copy Merged
Open As and Paste as a new Animation
Back in PSP Hide the bottom heart layer and unhide the middle layer. Copy Merged again.
Back in AS paste after current frame
Back in PSP hide the middle layer and unhide the top layer. Copy merged.
AS paste after current frame. You can view the animation to see if it how you like. Once happy you can save as GIF.
And your done.
Thanks for trying my tutorial. Hope you had fun!

Subscribe to:
Posts (Atom)
Looking 4 a Tut
