Template TOU
They are for Personal Use ONLY.
Do NOT share in groups/forums etc. have them come to my blog to download them for themselves.
You can use my templates for tutorials as long as you credit me and link back to my blog.
You CANNOT supply them for your tutorials either.
Monday, June 8, 2009
 My Friend
Click on Picture to see animation.
I'm using the Gorjuss artwork of Suzanne Woolcott. You must have a license to use her artwork. You can get one from GorjussArt.
Supplies:
Tube of Choice
Font of Choice
Animation Shop (opitional)
PlugIns:
DSB Flux - Bright Noise
Here we go...
Open a new canvus 650x650, flood fill white. You can always resize later.
Copy and Paste Frame18.Using your magic wand, click inside the frame. Selections-Modify-Expand by 5.Copy and Paste Paper1. Invert selection and hit delete on your keyboard. Move this layer below the frame layer.Add a drop shadow to the frame.
Copy and Paste your tube. Resize if needed. Duplicate and move original layer below the frame. Add a drop shadow to theduplicate tube. Now erase any parts of your tube that stick outside the bottom of the frame. You might have to erase someon the original one also.
Copy and Paste Element30. Add drop shadow. Place this to the right of the frame. See my tag for reference.
Copy and Paste Element58. Resize 45%. Add drop shadow and place on top of the heart charm to where it is covering the loopat the top.
Copy and Paste Element6. Resize 45%. Add drop shadow and place in the middle of the flower.
Copy and Paste Element40. Resize 45% and Mirror. Place this to the bottom left of the frame. Add drop shadow.
Copy and Paste Element48. Resize 45%. Place on top of the leaves. Add drop shadow.
Copy and Paste Element49. Resize 30%. Place this next to the pink rose. Add drop shadow.
Copy and Paste Element53. Place this to the top left. Duplicate and Flip. Merge Down. Duplicate and Mirror. Merge Down.Move this layer to the bottom just above the white background.
Copy and Paste Element3. Resize by 60%. Place this to the left.
Add name and Copyright.
Now for the Animation Part:
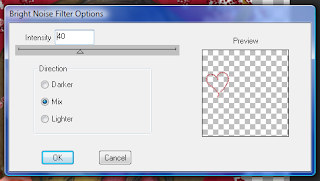
Duplicate element 53 twice so you should have three layers. On the bottom layer we are going to apply the bright noise with these settings:


Hit ok. Now on the middle layer apply the same settings but hit the mix twice. On the top layer apply the same settingsand hit the mix three times. Hide the the top and middle layer.
Go to Edit and Copy Special-Copy Merged
Open As and Paste as a new Animation
Back in PSP Hide the bottom heart layer and unhide the middle layer. Copy Merged again.
Back in AS paste after current frame
Back in PSP hide the middle layer and unhide the top layer. Copy merged.
AS paste after current frame. You can view the animation to see if it how you like. Once happy you can save as GIF.
And your done.
Thanks for trying my tutorial. Hope you had fun!
Subscribe to:
Post Comments (Atom)
Followers
Labels
- Armando Heurta (1)
- award (2)
- Barbara Jensen (1)
- Camilla Drakenborg (2)
- Collab (1)
- Diana Martinez (1)
- Elias Chatzoudis (5)
- FTU (21)
- FTU Artist (2)
- Ismael Rac (21)
- Jamie Kidd (2)
- Jose Cano (1)
- Kat NKDA (1)
- Keith Garvey (5)
- Legends Art (1)
- No Kit Used (6)
- PinUpToons (1)
- PTU (45)
- Shawli (1)
- Sole Otero (1)
- Susan McKivergan (3)
- Suzanne Woolcott (7)
- Templates (20)
- Tuts (64)
- Unholy Vault Designs (1)
- Zindy S.D. Neilsen (4)


0 comments:
Post a Comment
Note: Only a member of this blog may post a comment.