Template TOU
They are for Personal Use ONLY.
Do NOT share in groups/forums etc. have them come to my blog to download them for themselves.
You can use my templates for tutorials as long as you credit me and link back to my blog.
You CANNOT supply them for your tutorials either.
Sunday, September 6, 2009
 Sexy Tart

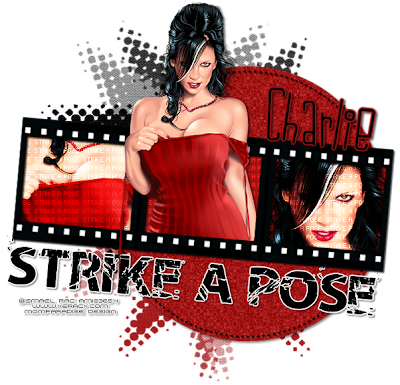
Click on image to view larger
I'm using the awesome artwork of Ismael Rac. You need a license to use his work. You can Purchase one at Artistic Minds Inc.
Supplies:
Tube of Choice
Font of Choice ( I used LDJ Jilly Nilly)
Missy's Template 249 HERE
Vix Mask 382 HERE
Plug Ins:
Xero-Fritillary
Eye Candy - Gradient Glow
Open Missy's template and duplicate (shift+D). Delete original temp and copyright info. Re-size the canvas to 650x600. You can crop it later.
On the circle layer. Select All-Float-De Float.
Open a new raster layer and fill with a color from your tube.
Keep Selected.
Delete original circle layer.
Go to Effects-Xero-Fritillary use these settings:
5, 30, 30, 27.
Select None.
Now add noise of 17 and Gaussian. Mono-chromed are checked.
Add a drop shadow of your liking.
Highlight the Dotted Circle layer.
Adjust-Brightness/Contrast change your brightness to -255
and contrast to 0.
Add a drop shadow.
Highlight the Film Strip background. Select All-Float-De Float.
Open a new raster layer and fill with a color from your tube.
Keep Selected. Delete original layer. Copy and Paste your tube.
Move it to the left square where only part of it is in it.
Invert Selection and hit delete on your keyboard.
Invert Selection again and do the same
thing only with the right square.
Select None.
Duplicate your tube layers.
Add a Gaussian Blur of 3 to the down tube layer and
change the blend mode to overlay or hard light
which ever one looks better for your tube.
Add a drop shadow to the top tube layer.
You want the words layer to be above your tube part layers.
Copy and paste your tube again. Re-size if needed.
Add a drop shadow.
Place this one in the middle square but you want it above the film strip layer.
We want it to look like it is coming out of the film strip.
Highlight the film strip layer Select All-Float-De Float.
Now erase the bottom part of your tube that is covering the strip.
You might have to erase some of the right of
the tube if you use the same tube as I did.
Now Invert Selection and erase the rest of the bottom of the tube.
Select None.
Highlight the Strike a Pose layer. Go to Effects-Eye Candy-Gradient Glow and add a thick white glow. Everyone using different types of Eye Candy so I leave
it up to you what the setting should be.
:)
Add a drop shadow
Now you should crop it to where its the size you want.
Add a new raster layer above the white background.
Flood Fill with a color from your tube.
Add another new raster layer and fill with another color from your tube.
Onthe first layer apply Vix's Mask 382. Merge Group. Move it to the top left.
Do the same for the second layer but Flip it.
Add your Name and add the same Gradient Glow but use a color from your tube.
Add a drop shadow.
Add your copyright. Delete the white background layer.
Merge Visible and save to your computer as a PNG.
You're Done!
Thanks for trying my tutorial. Hope you had fun!!
Subscribe to:
Post Comments (Atom)
Followers
Labels
- Armando Heurta (1)
- award (2)
- Barbara Jensen (1)
- Camilla Drakenborg (2)
- Collab (1)
- Diana Martinez (1)
- Elias Chatzoudis (5)
- FTU (21)
- FTU Artist (2)
- Ismael Rac (21)
- Jamie Kidd (2)
- Jose Cano (1)
- Kat NKDA (1)
- Keith Garvey (5)
- Legends Art (1)
- No Kit Used (6)
- PinUpToons (1)
- PTU (45)
- Shawli (1)
- Sole Otero (1)
- Susan McKivergan (3)
- Suzanne Woolcott (7)
- Templates (20)
- Tuts (64)
- Unholy Vault Designs (1)
- Zindy S.D. Neilsen (4)


0 comments:
Post a Comment
Note: Only a member of this blog may post a comment.