Template TOU
They are for Personal Use ONLY.
Do NOT share in groups/forums etc. have them come to my blog to download them for themselves.
You can use my templates for tutorials as long as you credit me and link back to my blog.
You CANNOT supply them for your tutorials either.
Tuesday, August 25, 2009
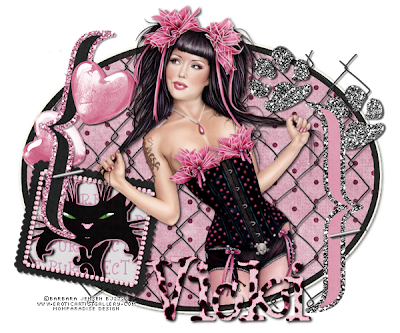
 Little Sex Kitten

click on the image to view larger
I'm using the awesome artwork of Barbara Jensen. You need a license to use her work. You can purchase one on her website HERE.
Supplies:
Tube of Choice
Font of Choice ( I used 0 Whoa DNA)
Scrap kit "Sex Kitten" by Vicki. You can purchase it HERE or HERE.
No outside plug ins needed
Got it all? Good, Let start.
Open a new canvas 600x500, flood fill white.
Using the Ellipse Tool, draw out a fairly large oval. Convert to Raster. Now go to Selections-Select All-Float-De Float. Copy and Paste Paper 8. Invert selection and
hit delete on your keyboard. Keep Selected and Invert again. Selections-Modify-Expand by 10. Copy and Paste Paper 2. Invert Selection and hit delete on your key
board. Invert Selection one more time (LOL I promise last time). Selections-Modify-Expand by 8. Add a new raster layer and flood fill with white. Select None. Move
the white layer below the paper 2 layer and merge together. Add a drop shadow and move this layer below the Paper 8 layer.
Copy and Paste Element 7. Resize by 80%. Add drop shadow.
Copy and Paste Element 53. Rotate 11 right. Add drop shadow and move to the left of the oval near the top.
Copy and Paste Element 54. Add drop shadow and move to the right of the oval near the bottom.
Copy and Paste Element 33. Resize by 45% and Rotate 11 right. Move this to the left and under the Bracket. With your Magic Wand click inside the frame. Go to
Selections-Modify-Expand by 6. Copy and Paste Paper 14, resize the paper by 80%. Invert Selection and hit delete on your keyboard. Select None. Move paper
below frame layer and Add drop shadow to the frame.
Copy and Paste Element 29. Move it to where the cat's face is in the middle of the frame. Highlight the paper 14 layer and Selections-Select All-Float-De Float. Go
back to the cat layer and Invert Selection. Hit delete on your keyboard. Select None. Add drop shadow to the Cat.
Copy and Paste Element 5. Resize by 45% and add a drop shadow. Rotate 7 left. Move to the left making it look like its holding the bracket and frame to the oval.
See my tag for reference. Duplicate and move it to the right so it looks like its doing the same to the other bracket.
Copy and Paste Element 42. Resize by 45% and add s drop shadow. Move to where it is over the left bracket but still with-in the oval. Duplicate layer and move the
original below the bracket, frame, paper, and cat layers. Back tot he copy hearts and erase the heart that is sideways.
Copy and Paste Element 51. Resize by 70% and add a drop shadow. Move to the top right and move it to where it is below all the other elements but just above the
wire layer.
Copy and Paste your tube. Resize if needed. Add a drop shadow. Highlight the small oval layer. Selections-Select All-Float-De Float. Back to your tube layer. Invert
Selection. With your Eraser Tool. erase the bottom part of your tube, making it look like it's inside the oval. See my tag for reference. Select None.
Open Paper 15. Back to you tag. Set the paper to your Background color and your foreground to null. Now type out you name and Convert to raster layer. Add a
strong drop shadow.
Add your copyright. Delete the white background and Merge Visible. Save as a PNG to your computer.
You're Done!!
Thanks for trying my tutorial. Hope you had fun!!
Subscribe to:
Post Comments (Atom)
Followers
Labels
- Armando Heurta (1)
- award (2)
- Barbara Jensen (1)
- Camilla Drakenborg (2)
- Collab (1)
- Diana Martinez (1)
- Elias Chatzoudis (5)
- FTU (21)
- FTU Artist (2)
- Ismael Rac (21)
- Jamie Kidd (2)
- Jose Cano (1)
- Kat NKDA (1)
- Keith Garvey (5)
- Legends Art (1)
- No Kit Used (6)
- PinUpToons (1)
- PTU (45)
- Shawli (1)
- Sole Otero (1)
- Susan McKivergan (3)
- Suzanne Woolcott (7)
- Templates (20)
- Tuts (64)
- Unholy Vault Designs (1)
- Zindy S.D. Neilsen (4)


0 comments:
Post a Comment
Note: Only a member of this blog may post a comment.